


Hello World! in Rescript React
What is Rescript? 🤔
It is a language that combines the best parts of JS and OCaml. It has a compiler that compiles to JS and leverages OCaml’s static and sound type system. The compiler was originally named BuckleScript but in 2020, it was rebranded to ReScript because of its Reason-like syntax.
Where can I learn more about it?
Rescript docs are well written, organized, and maintained actively. Take a look at their documentation here.
So, let's start with "Hello World!"
If you have a basic knowledge of Rescript syntax and React, then we are good to go.
Setting up the project
- Start with the command
npm init -y. If you simply donpm initit will ask you to fill in a couple of data, if you want them to be default values add the-ytag.
$ npm init -y
- Now, let's install the ReScript compiler locally. The reason we are installing it with
--save-devis because we need it as a developer dependency. The Rescript compiler will compile the.resfiles to.jsfiles. This is actually called source-to-source compilation.
$ npm install --save-dev bs-platform
- Before, moving on to the configuration part, let's install the
rescript-reactplugin.
$ npm install @rescript/react --save
- Now, we have to set up a
bsconfig.jsonfile. Create this file and then copy and paste the following into it:
bsconfig.json
{
    "$schema": "https://raw.githubusercontent.com/rescript-lang/rescript-compiler/master/docs/docson/build-schema.json",
    "name": "project-name",
    "sources": [
        {
        "dir": "src",
        "subdirs": true
        }
    ],
    "package-specs": [
        {
        "module": "es6",
        "in-source": true
        }
    ],
    "suffix": ".bs.js",
    "namespace": true,
    "bs-dependencies": ["@rescript/react"],
    "ppx-flags": [],
    "reason": {"react-jsx": 3},
    "warnings": {
        "error": "+101"
      },
    "refmt": 3
}
Let's understand the config for a moment, going line by line:
$schema: Editors like VSCode have a feature of schema autocompletion, and to get that we need to specify a schema. Here, we are specifying the schema for rescript.
name: It is the name of the library or the main project name.
NOTE: The name in
bsconfig.jsonshould be the same as the name inpackage.json, to avoid confusing corner-cases. However, this means that you can't use camelCased names such as MyProject, sincepackage.jsonandnpmforbid you to do so (some file systems are case-insensitive).
sources: We have to specify where the source files will reside. Usually, it is the
/srcdirectory.suffix: The file extensions after compilation by the Rescript compiler, can be
.jsor.bs.js. ( Although, the latter is always preferred )bs-dependencies: The list of Rescript dependencies, and since we are using the
rescript-reactwe have to specify that here. There are alsobs-dev-dependencies. These are very similar to how we mention node dependencies inpackage.json.reason: Since we will be using React-JSX, we have to specify
{"react-jsx": 3}.
For normal Rescript projects, the
bs-dependencieswill have[]andreasonwill be{}. You can read more about the config here
- To compile the source files we have to add two scripts in our
package.json.
package.json
"scripts": {
    "clean": "bsb -clean-world",
    "start": "bsb -make-world -w",
}
start: will compile the res files and will run in watch mode i.e will continuously look for changes and compile it. It is always advised to run the start script and then code the Res files, cause the intelligent rescript compilation helps a lot and makes the coding easier for beginners to the language.
clear: will clean/remove the previously compiled
*.bs.jsfiles.
- Now, install
reactandreact-dompackages.
$ npm install react react-dom --save
Finally, we will use
snowpackto build and bundle the project during development. Insnowpackeach file needs to be built only once and then is cached forever. When a file changes, Snowpack rebuilds that single file. There’s no time wasted re-bundling every change, just instant updates in the browser (made even faster via Hot-Module Replacement (HMR)). It is really fast.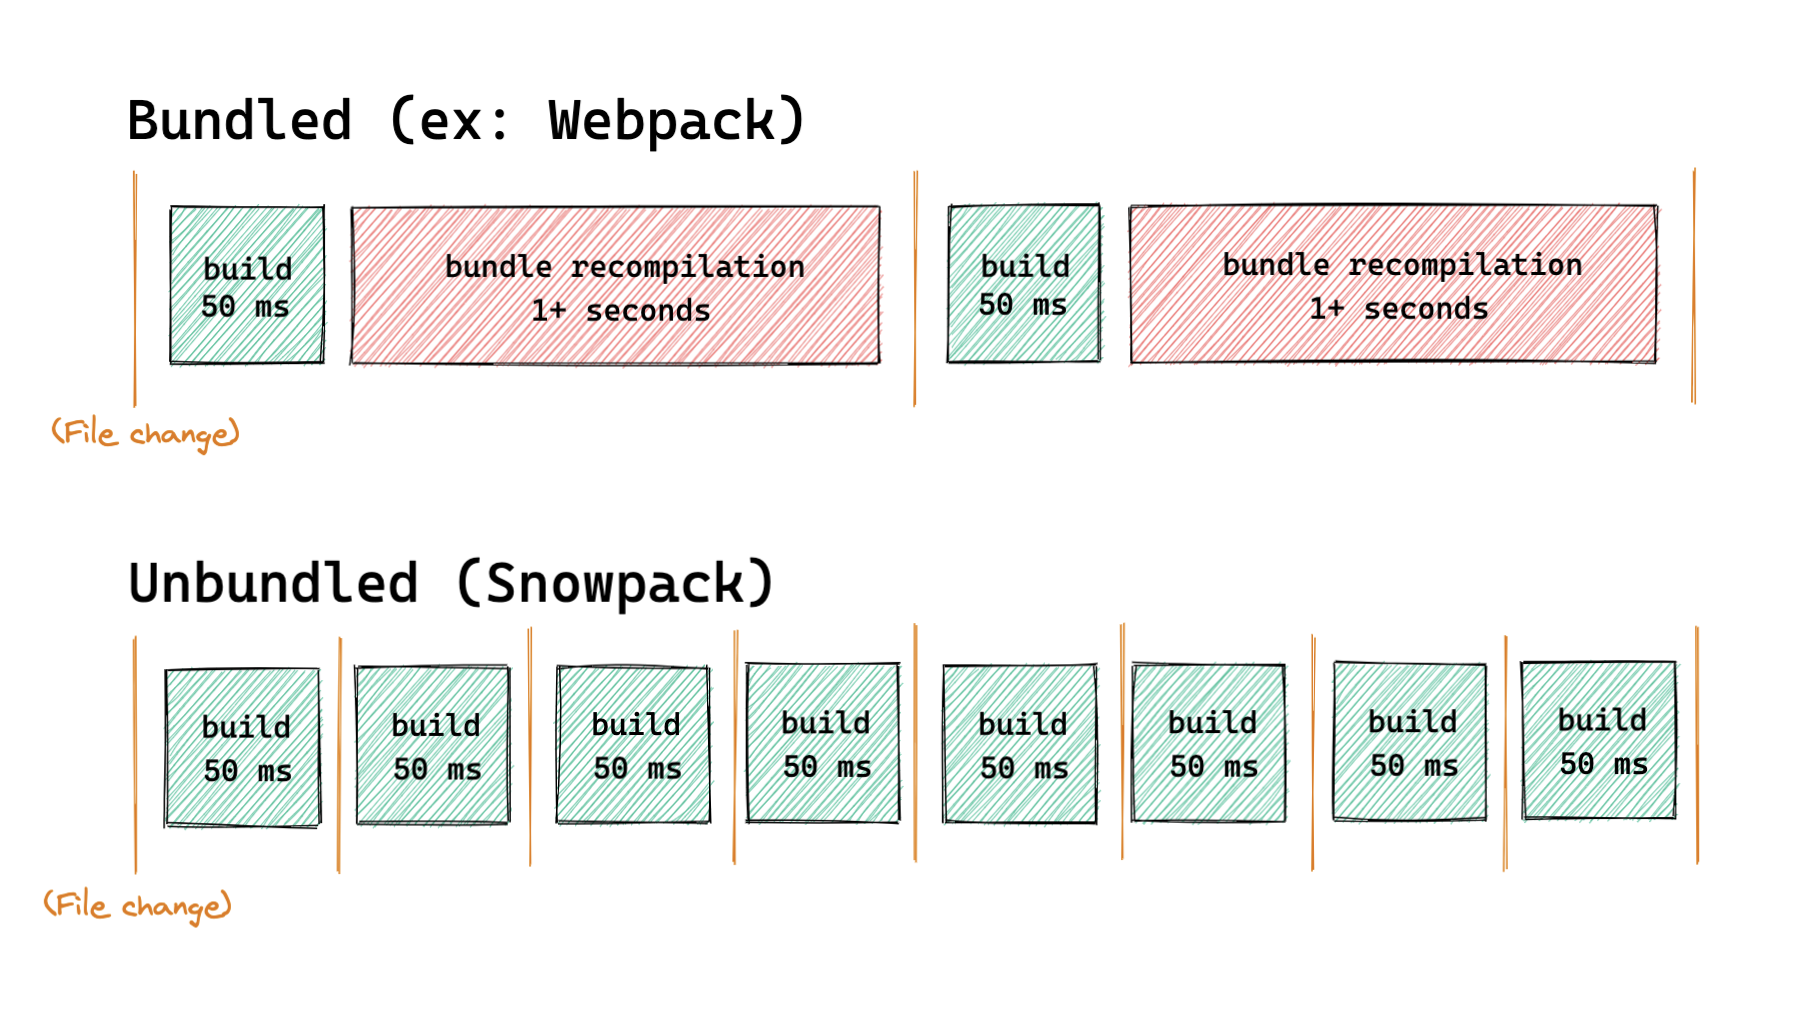
We will install snowpack as a dev dependency:
$ npm install --save-dev snowpack
- Make a
snowpack.config.jsfile and copy-paste this. Since we are not using any kind of plugins there is nothing to specify over here.
snowpack.config.j
// Example: snowpack.config.js
// The added "@type" comment will enable TypeScript type information via VSCode, etc.

/** @type {import("snowpack").SnowpackUserConfig } */
module.exports = {
    plugins: [
        /* ... */
    ],
};
- Now, we have to add a couple of npm scripts for the snowpack to start the server and build the project.
package.json
"scripts": {
    "dev": "snowpack dev",
    "build": "snowpack build"
}
At, this point we are done setting up dependencies, and your final package.json should look like this:
package.json
{
  "name": "react-res-test",
  "version": "1.0.0",
  "description": "",
  "main": "index.js",
  "scripts": {
    "clean": "bsb -clean-world",
    "start": "bsb -make-world -w",
    "dev": "snowpack dev",
    "build": "snowpack build"
  },
  "keywords": [],
  "author": "",
  "license": "ISC",
  "devDependencies": {
    "bs-platform": "^9.0.1",
    "snowpack": "^3.0.13"
  },
  "dependencies": {
    "@rescript/react": "^0.10.1",
    "react": "^17.0.1",
    "react-dom": "^17.0.1"
  }
}
Start writing your Hello World Code!!
- First, start off with a simple
index.htmlin your root directory. Paste this basic template. One important thing is that there should be a<div>withid="root"inside which the React components will be rendered. Also, we have to include the compiledindex.bs.jsfile. You can simply copy-paste this HTML. If you will useindex.cssthen create a file and add its relative path as well.
index.html
<!DOCTYPE html>

<html lang="en">
  <head>
    <meta charset="utf-8" />
    <title>ReScript React</title>
    <link rel="stylesheet" href="index.css" />
  </head>
  <body>
    <div id="root"></div>
    <script type="module" src="src/index.bs.js"></script>
  </body>
</html>
- Now create a folder
srcand create a new filesrc/index.res. Inside theindex.resfile just copy-paste this for the time being. We will dive into the code later on. Currently, let's test if all the setup we did was a success.
switch ReactDOM.querySelector("#root") {
| Some(root) => ReactDOM.render(<div> {React.string("Hello World!")} </div>, root)
| None => Js.log("Error: could not find react element")
}
NOTE: Here we are querying for
#rootin the DOM(index.html) i.e looking for an element withid="root". If in theindex.htmlyou have specified some other id value, let's sayxyzthen over here you have to replace#rootwith#xyz.
- Now, in the terminal run the command to compile the
index.resfile.
$ npm run start
Once you run this, a new file index.bs.js will be created. ( This is why we included the index.bs.js file in <script> tag in index.html ).
To build the react app run this in another terminal.
$ npm run dev
This will start a snowpack server at localhost:8080 with hot-reload. Visit the URL in your browser and if you see Hello World! Congratulations!! You are now ready to create your rescript-react project.
NOTE: Don't keep your
index.cssfile empty if you have linked it to theindex.html.
The final folder structure will look like this:
├── bsconfig.json
├── index.css
├── index.html
├── package.json
├── package-lock.json
├── snowpack.config.js
└── src
    ├── index.bs.js
    └── index.res
Was it a long process? Yeah, kind of. But every time you won't have to go through it all. Here I have already created a repo with all these steps. Simply clone it and get started:
arnabsen1729/rescript-react-starter
Hi 👋, hope you liked my blog. I am still a newbie in this technical content writing field, so would really appreciate the honest feedback. Feel free to connect with me through any of my social handles. You can find them here: arnabsen.bio.link